I use this simple salt dough recipe for a lot of different craft projects – it isn’t just for Christmas decorations!
Salt dough is cheap and cheerful! Simple ingredients, easy to prepare and hard-wearing. A perfect combination.
Simple Salt Dough Recipe
It doesn’t matter what quantities you are using. It works on a principle of half, half and whole.
1 qty of plain flour, ½ qty table salt and ½ qty of cold tap water.
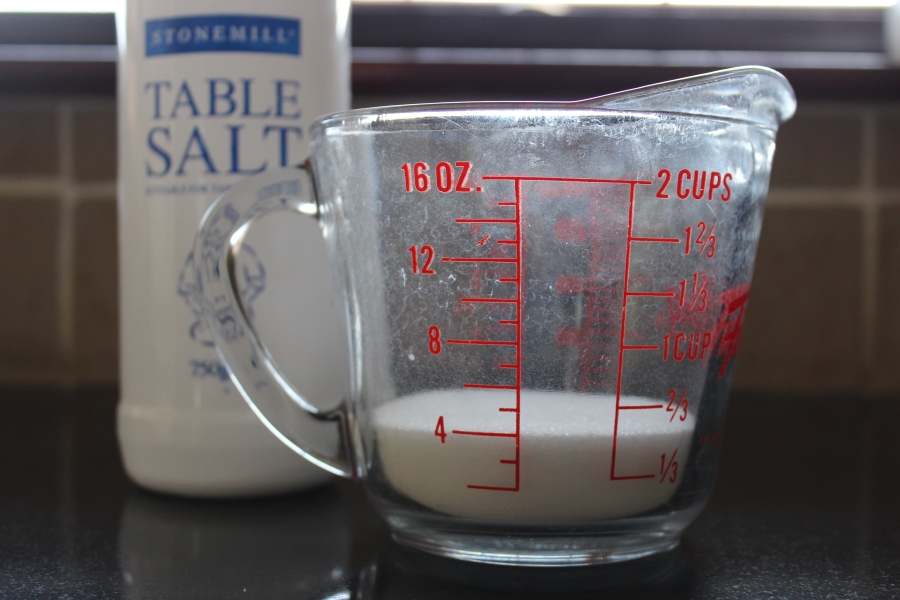
For today’s batch I have used:
1 Cup of flour (8oz/225g)
½ Cup of Salt (4oz/112g)
½ Cup of cold water (4floz/100ml)
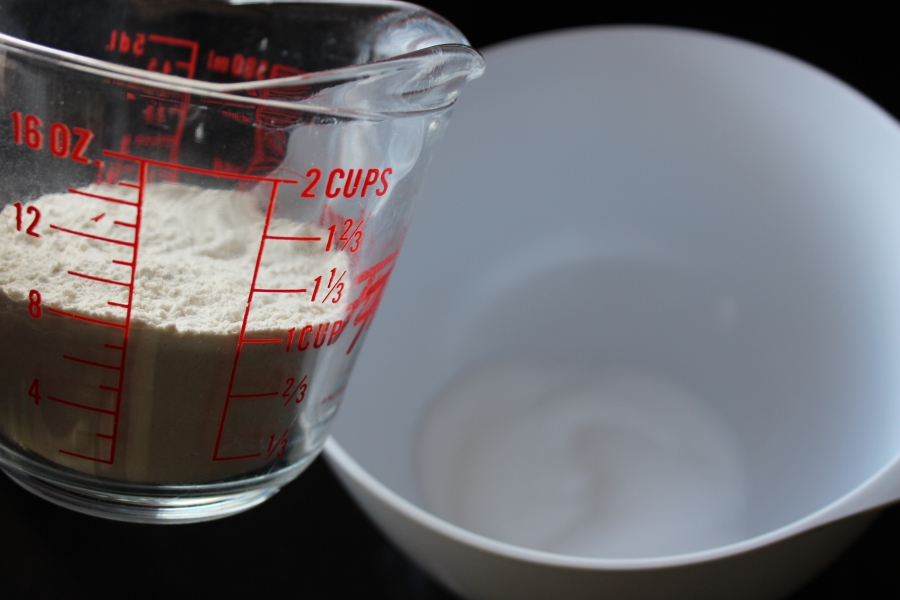
Mix the flour and salt, together, in a bowl
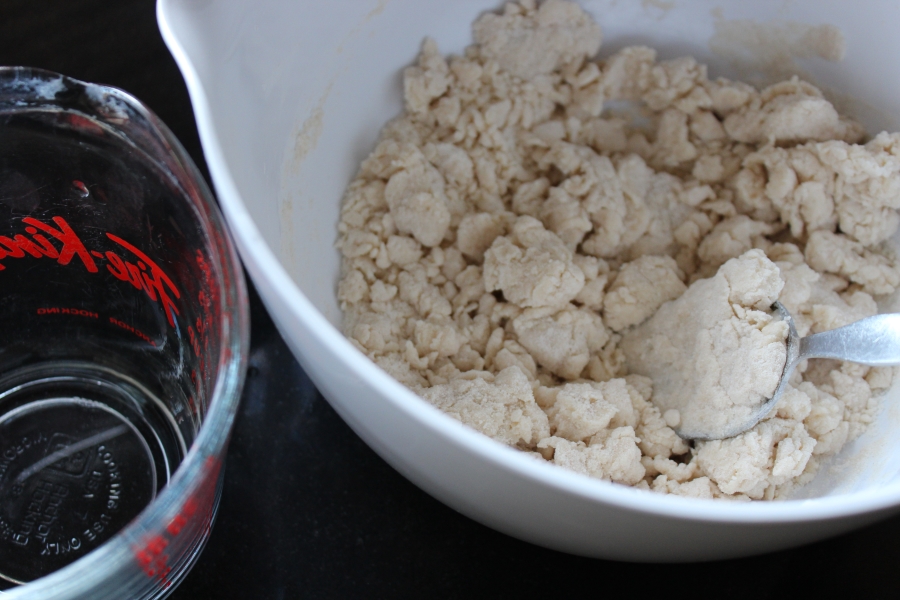
Gradually add the cold water and mix with a metal spoon. Do not add all at once.
When the mixture looks similar to mine, it’s ready. There is a little water still in the jug, I never quite use it all, The mixture should not be soggy.
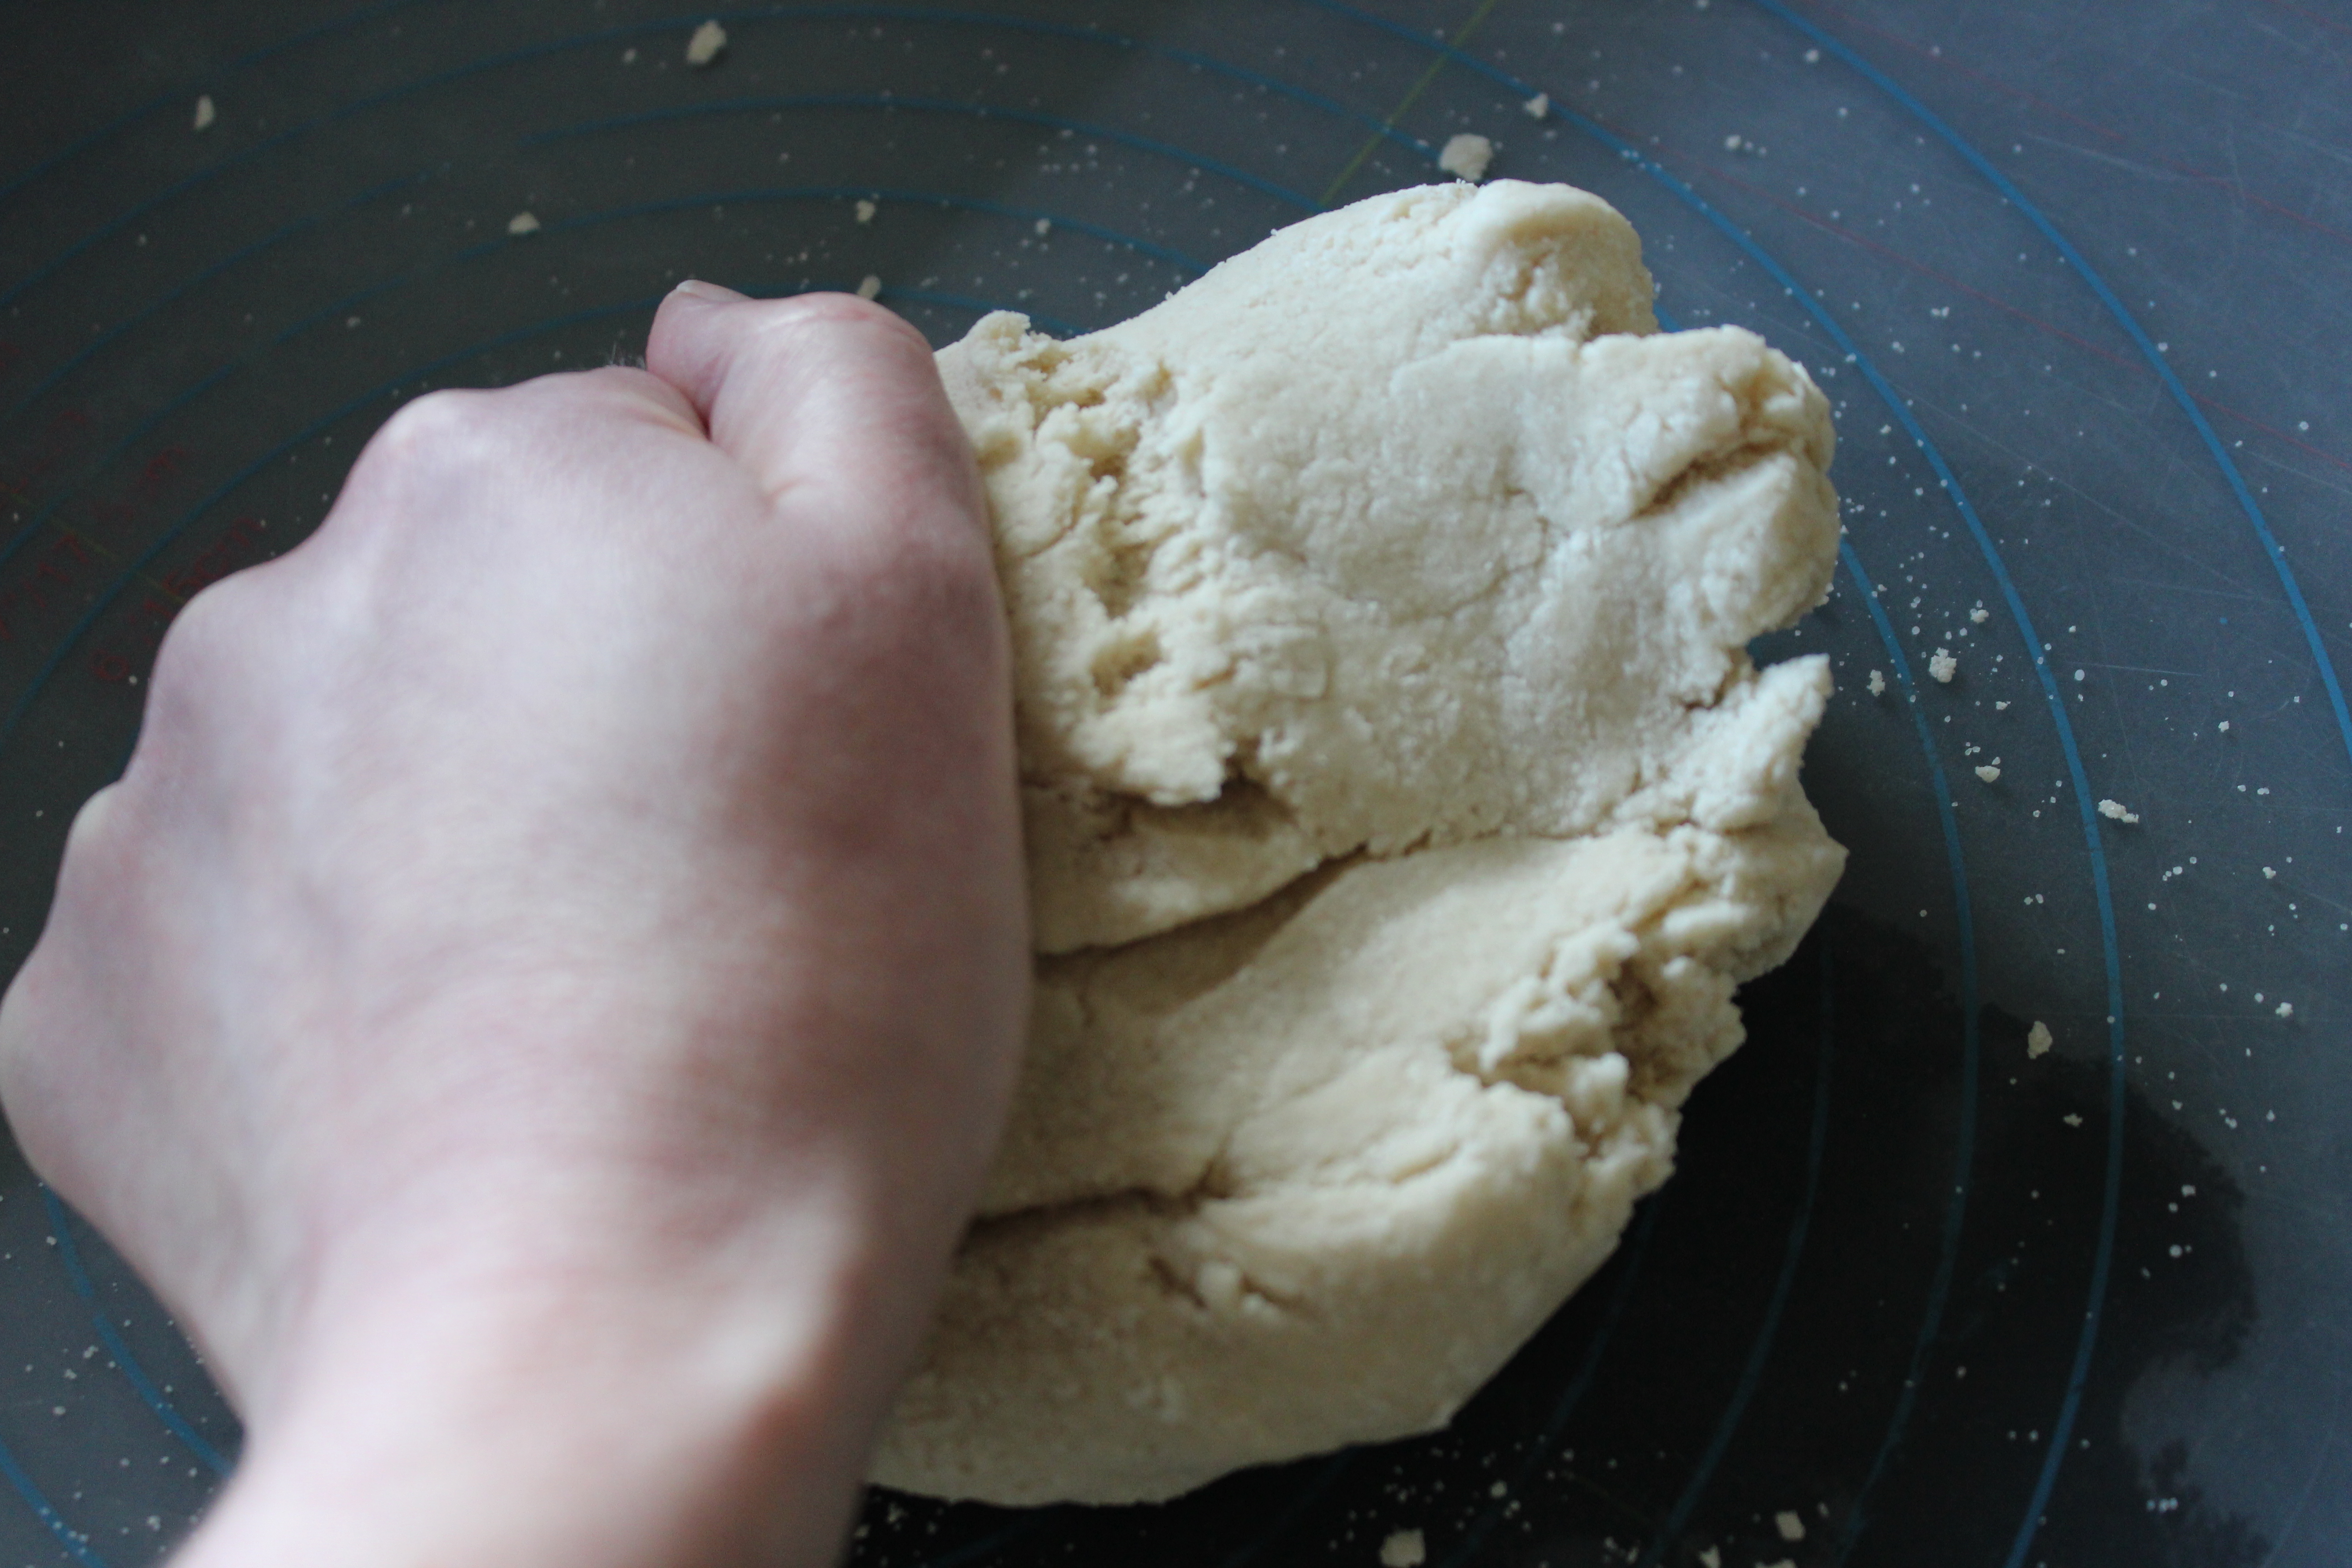
Time to get your hands in. Make into a ball. Beware! Salt can irritate some people’s hands. I’m okay as long as I’m not making multiple batches. Make sure after handling the dough you wash your hands thoroughly and you may need to moisturise (salt draws out moisture).
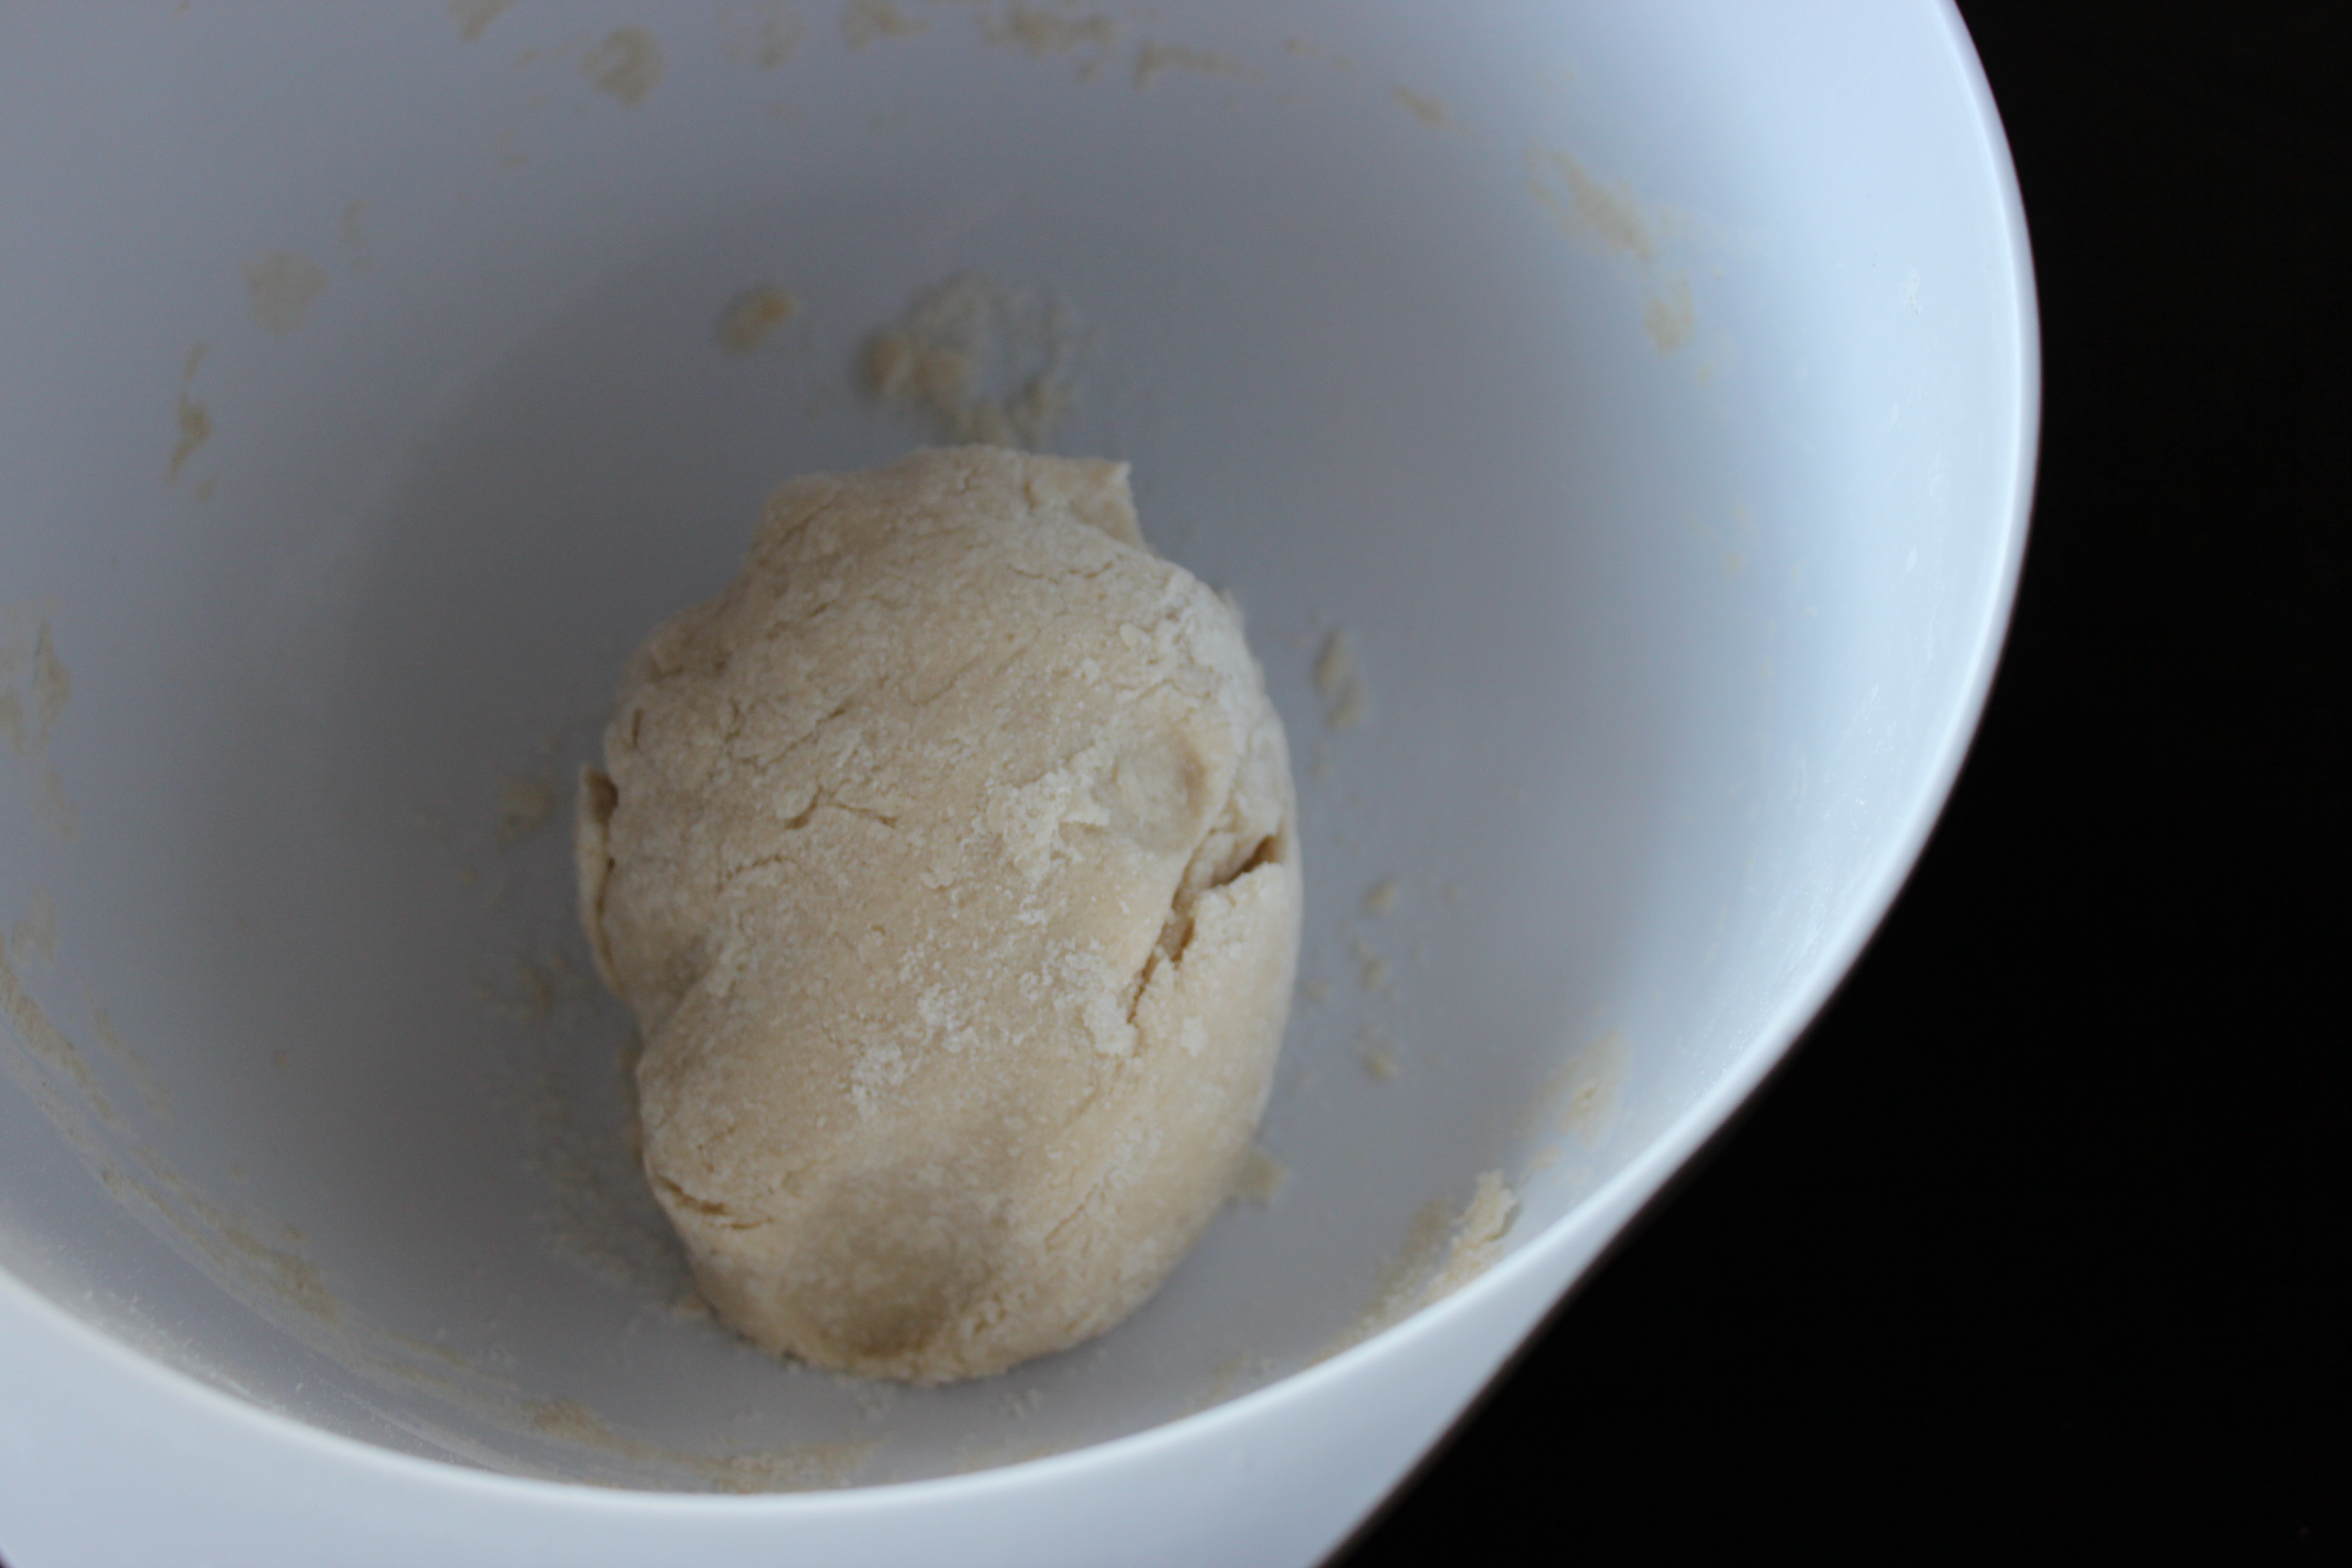
Knead the dough directly onto your counter, board or mat. I have to use a non-stick mat because I have granite work surfaces and it’s too cold to knead onto. If you’ve got your consistency right you shouldn’t need a dusting of flour. But if it starts to stick add some flour and work in.
Knead until smooth as you would cookie/biscuit dough.
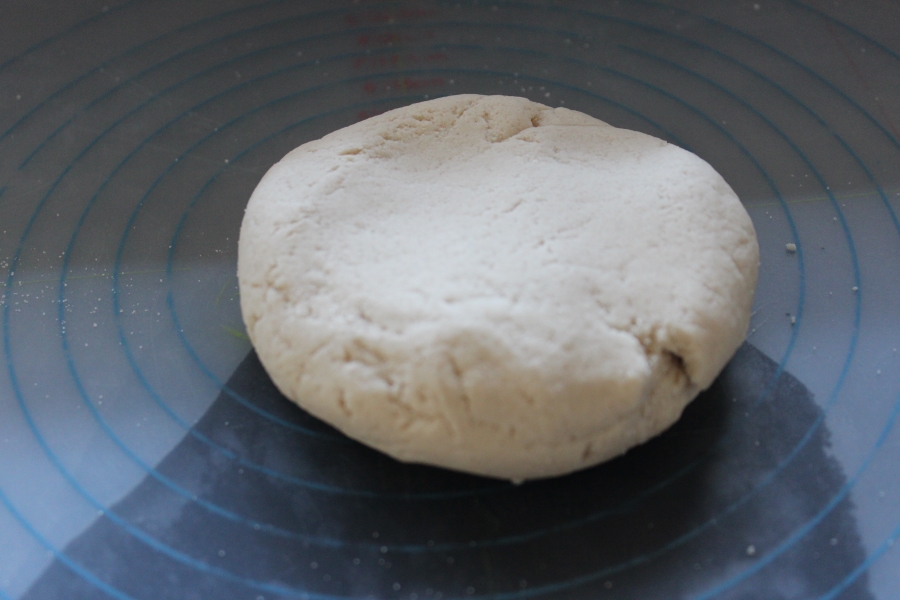
Make into a ball and press down to flatten slightly.
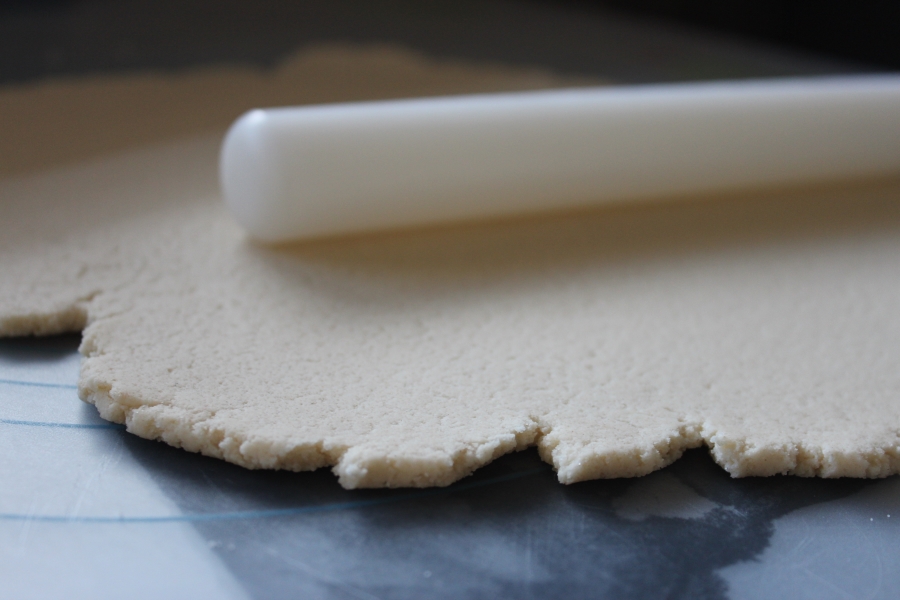
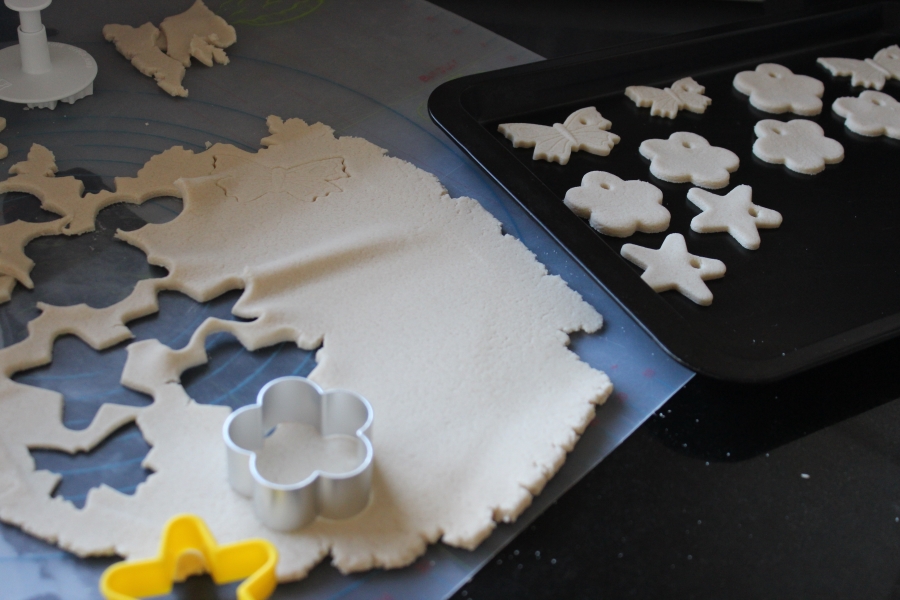
Roll out to the desired thickness.
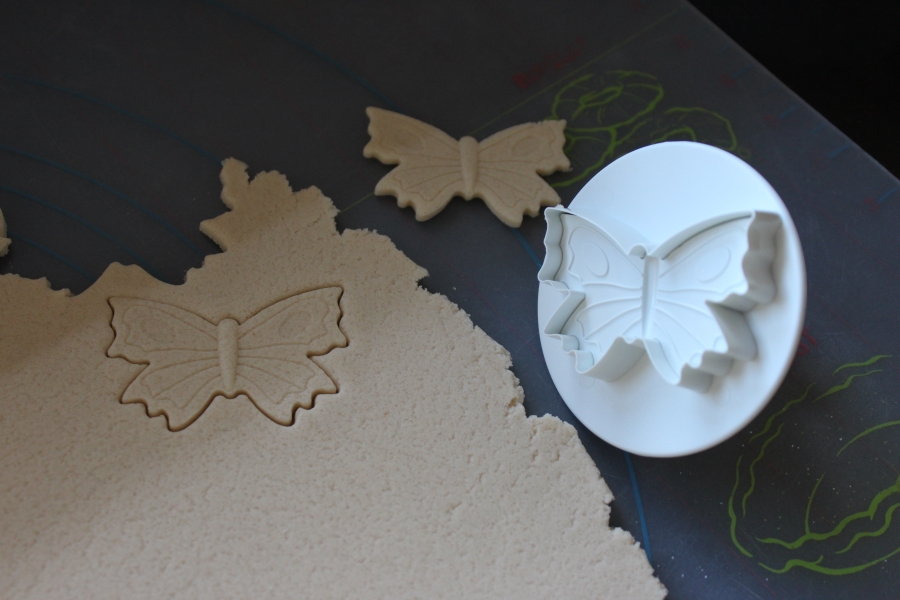
Use cutters to make the required shapes. Very similar, again, to how you’d make cookies or biscuits.
Place directly onto a non-stick tray.
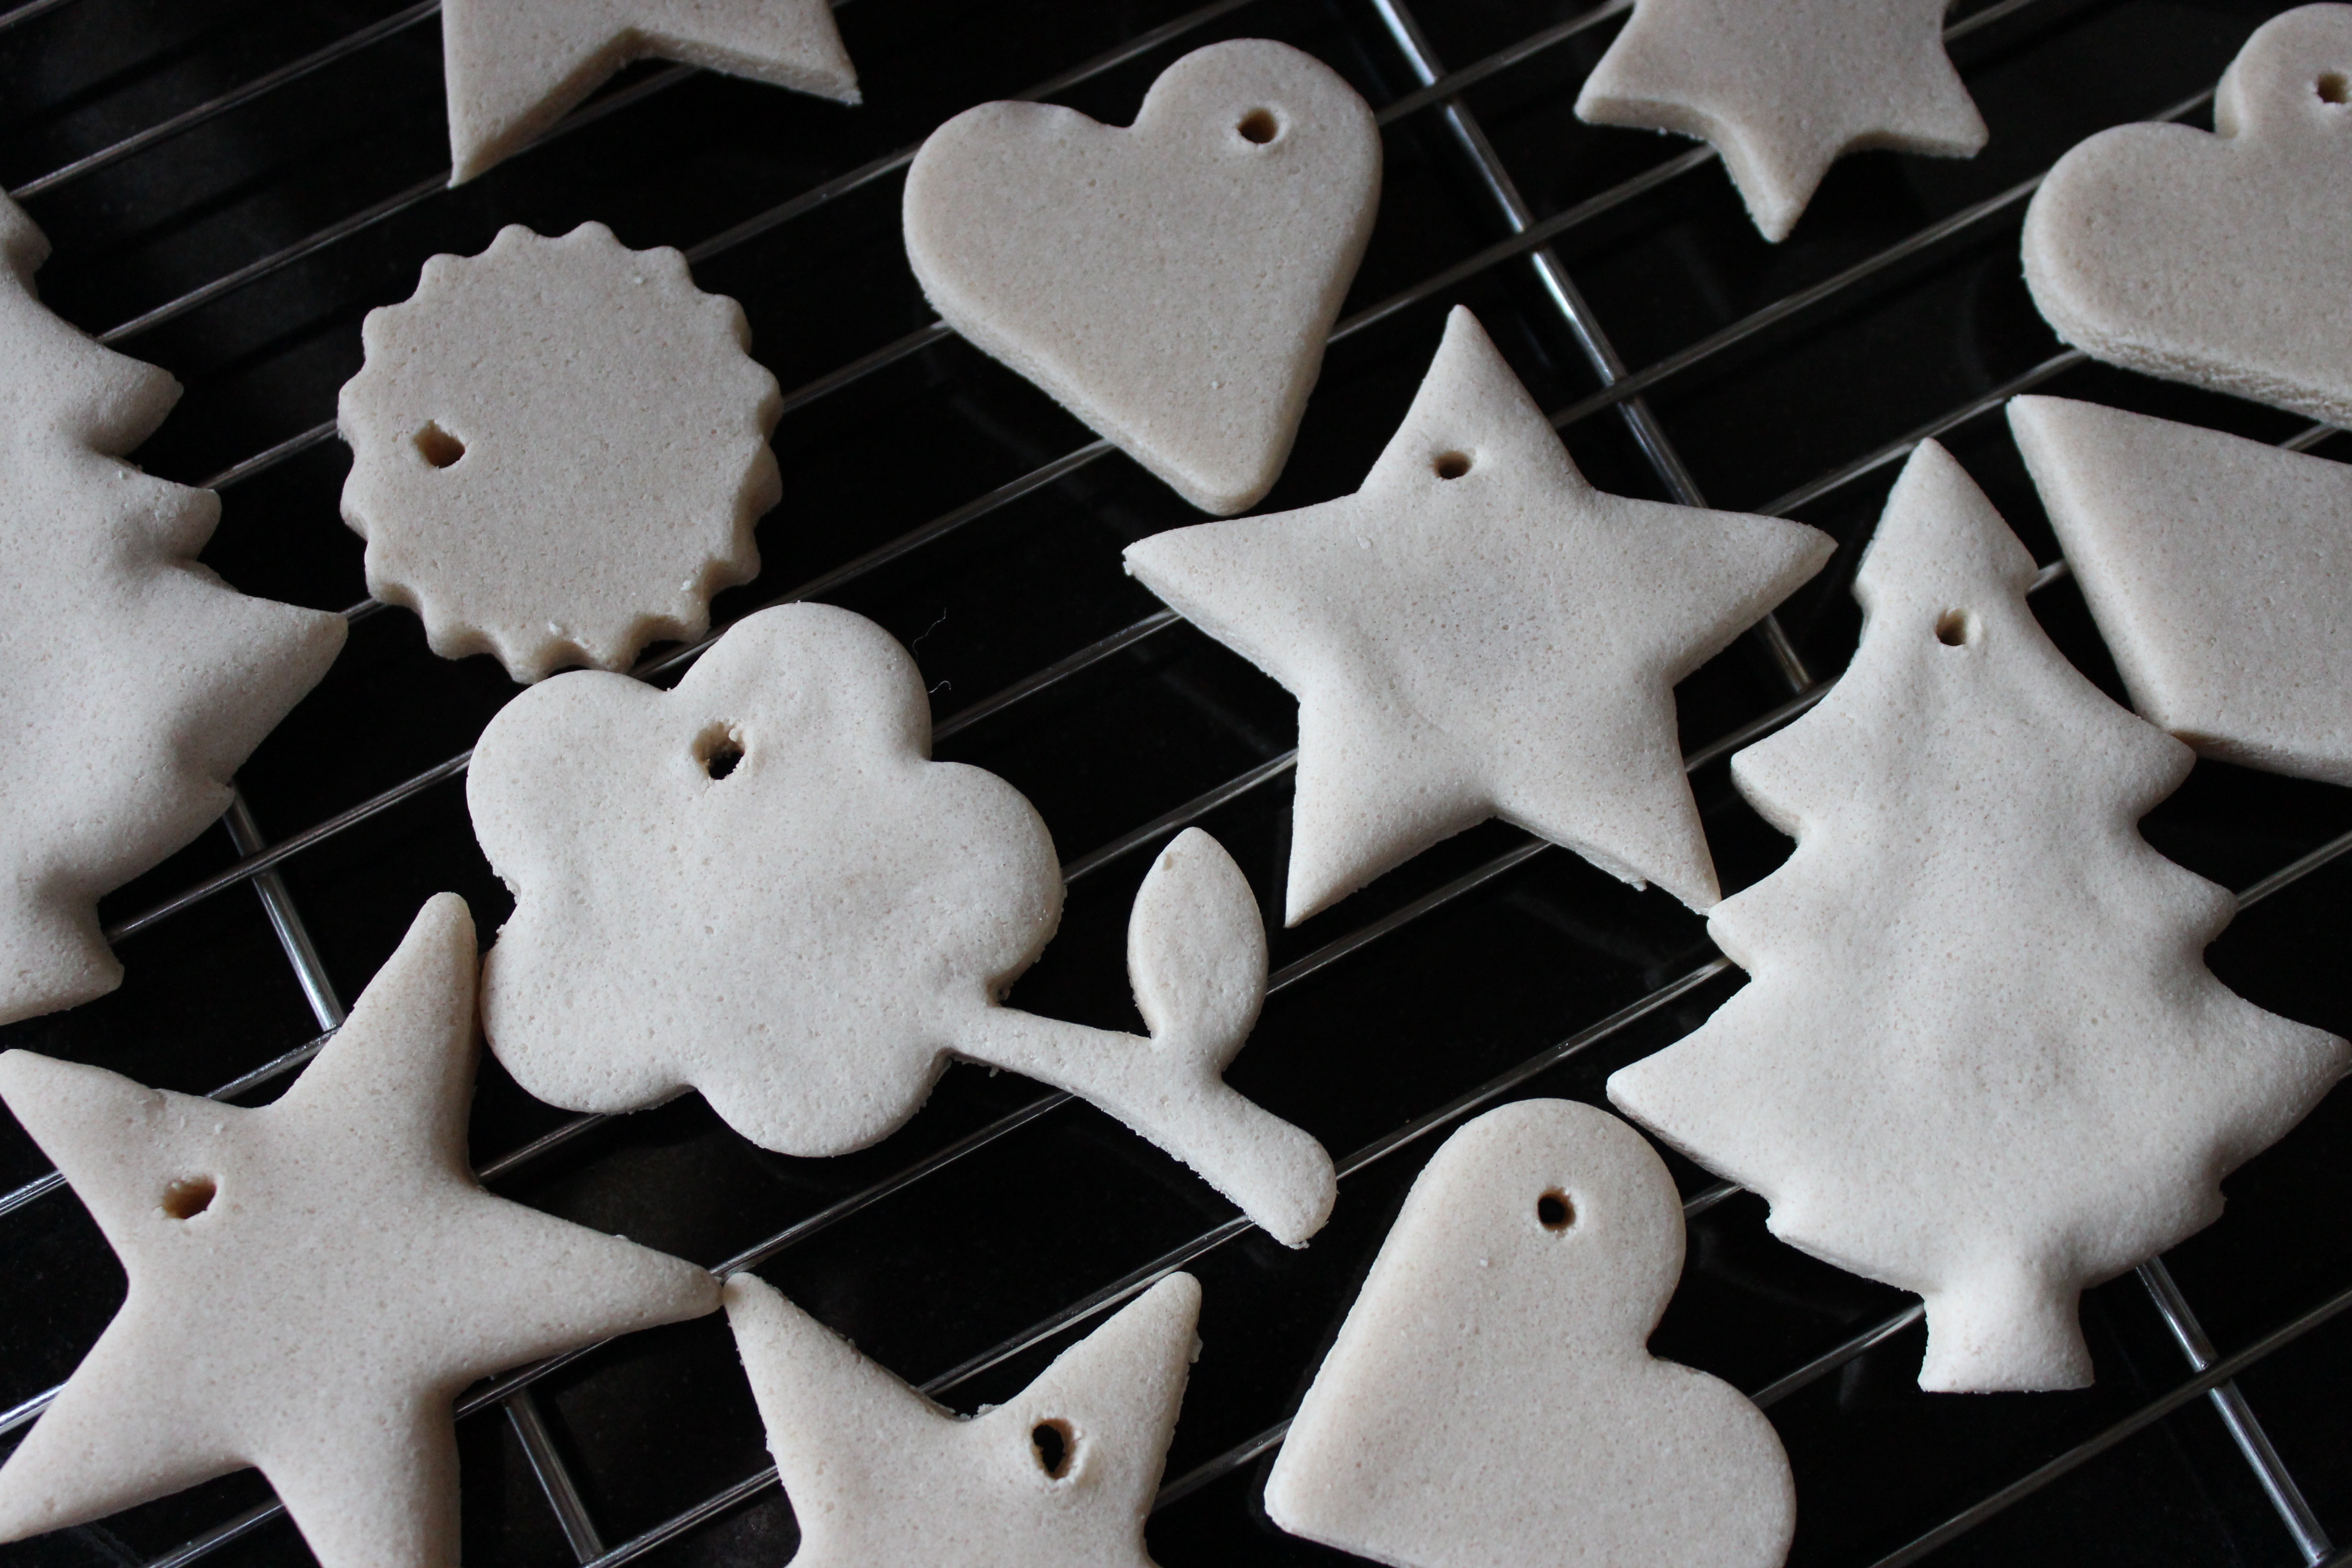
Place in a pre-heated cool oven (lowest setting) for 3-4 hours in total! Yep…it’s a long time! I turn them over half way through. Some recipes suggest microwaving, but I have never had success with this. The shapes rise and crack in my experience. They can be left to air dry also, but this takes days so can only be done if you’re not in a hurry.
As today’s batch are still in the oven, in true Blue Peter style – here’s some I made earlier…
Salt dough is best used when fresh. However you can wrap in cling film and refrigerate for up to 3 days. It can become a little ‘wet’ if kept like this and you may need to add flour. I try not to store mine as the results haven’t been up to scratch when I have.
This is what I do with mine…
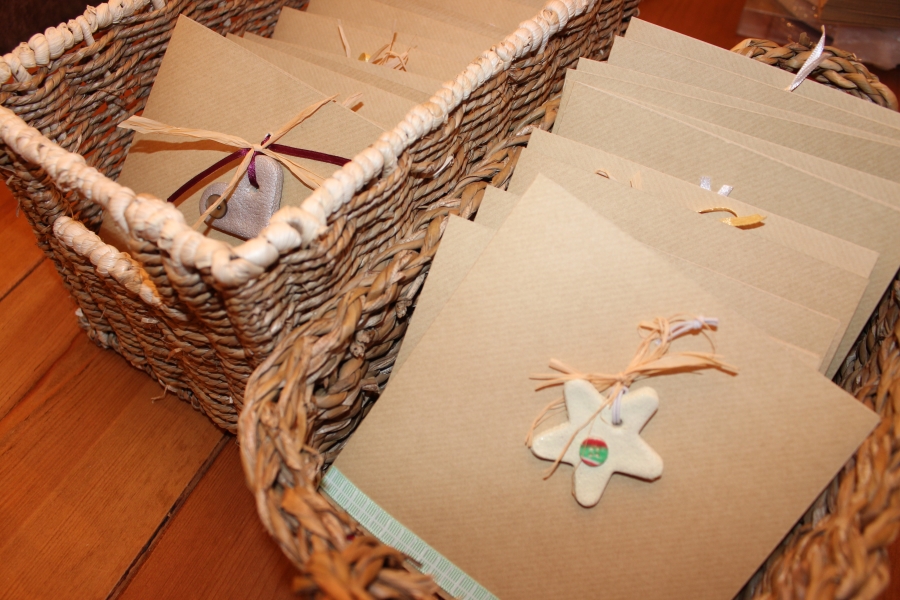
What will you do with yours?
Thanks so much! Your cut-outs look so tidy. I shall try some later, I love the way you use them to make cards. You’ve also stamped initials and shapes onto the wet dough too. What about painting and sealing them please?
When you use cutters – cut onto a non-stick mat. Rub the cutter a few times back and forth against the mat to wipe off excess dough. Lift cutter with dough inside and turn over, if there are still bits off excess dough, run a blunt knife across the cutter’s flat edge – straight across. This should make clean lines. If you want a hole in the shape, to thread ribbon through etc…, then make the hole with a skewer whilst the dough is still in the cutter. This supports the outline and reduces the dough spreading and making it misshaped.
I’ll do a separate post about decorating, as I’ll show step by step. Watch this space!
“make the hole with a skewer whilst the dough is still in the cutter”. D’oh, why didn’t I ever think of that!!!
I love simple solutions.
I making Santa ornaments with the grandkids A hand print upsidedown works great! Then paint it to look like Santa 😀
Sounds fantastic!
I am thinking about making some of these for my daughter’s wedding in July. The service is at our cottage and the reception is
In Gravenhurst on the Wenonah Steamship.
Do you feel these would be ok?
At 58 years old I am just starting to do crafts for the first time in my adult life.
Thanks for your craft ideas
Wendy
I think that these would be lovely as a wedding favor (if that is what you are meaning). Of course, it depends on the style of the wedding and the preferences of the bride. I personally enjoy those simpler things in life.
Thanks so much! Your cut-outs look so tidy. I shall try some later, I love the way you use them to make cards. You’ve also stamped initials and shapes onto the wet dough too. What about painting and sealing them please?
When you use cutters – cut onto a non-stick mat. Rub the cutter a few times back and forth against the mat to wipe off excess dough. Lift cutter with dough inside and turn over, if there are still bits off excess dough, run a blunt knife across the cutter’s flat edge – straight across. This should make clean lines. If you want a hole in the shape, to thread ribbon through etc…, then make the hole with a skewer whilst the dough is still in the cutter. This supports the outline and reduces the dough spreading and making it misshaped.
I’ll do a separate post about decorating, as I’ll show step by step. Watch this space!
“make the hole with a skewer whilst the dough is still in the cutter”. D’oh, why didn’t I ever think of that!!!
I love simple solutions.
I making Santa ornaments with the grandkids A hand print upsidedown works great! Then paint it to look like Santa 😀
Sounds fantastic!
I always use a drinking straw to make my holes, they come out clean and are easily done. You can blow the dough plug out of the straw or use a toothpick or skewer to push the dough out – cut the straw into a shorter length to make this easy.
It’s been a long time since I have made this and did the air drying at that time. The classic thing to do with salt dough is to have small children press their hand prints into it for keepsakes.
Now that’s a good idea! I’ve used clay previously…much more expensive!
This recipe is great for my daughter’s project.
I did the hand print thing. So disappointed, made it for fathers day and followed the instructions, the dough bubbled during baking and after it had cooled i picked it up and it shattered
I was going to ask when you put the holes in for hanging, but I see you’ve already answered 🙂 I will tuck this post away in my head for now, because I know it’s going to come in handy sooner or later. Thanks for sharing, and I’m looking forward to the post on decorating.
When my kids were little, I used to make a cooked salt dough that was quite similar to the play dough sold in stores. It kept for a long time and cost so little to make. If only more moms knew how cheaply certain things can be made!
Yes if only… I’m going to give soft dough a go I reckon…any tips?
The recipe I have is:
1 c flour, 1/2 c salt, 2 tsp cream of tartar, 1 c water, food colouring (optional), and 4 tsp of cooking oil. Mix flour, salt and cream of tartar. Add food colouring to water. Mix water, oil, and flour mixture over low heat. Stir until thick. Remove immediately from heat, knead and let cool. (Careful – it’s hot – I used to plop it from the pot onto the cold counter, and it cooled fairly quickly, enough that I could knead it and bring the hot spots to the outside, where the counter would cool them too.) Store in airtight container.
Notes: I found the best time to take it off the heat was when it looked like dry-ish mashed potatoes, held together and formed a ball easily. At this point it’s important to get it off the heat and get it cooled quickly to avoid overcooking which will cause it to become too dry. For storage, we kept it in the fridge so it would stay fresh longer.
Good luck! If you have any questions, let me know.
Thanks for this Jo – I will most certainly be trying it out….Thanks again!
how do you preserve them as i have just bought some back from the uk with all my grandchildrens hand prints on them? I can paint them but if i want to put them outside will they then take in the moisture in the air.
Julia – I cant say 100%. As I live in the UK the dough gets drier and drier as it stands. But if you are in a particularly humid environment I do not know whether this would affect the dough. Sorry. My instinct says that they’ll be fine – but cant guarantee it! Jo
Is that recipe not for playdough Jo ?
Just thought I’d let you know that we have just used your “recipe” in 2020, 7 years later! 😀 Theyre just about to go in the oven! 😀
Hope they turn out well!
I was going to ask when you put the holes in for hanging, but I see you’ve already answered 🙂 I will tuck this post away in my head for now, because I know it’s going to come in handy sooner or later. Thanks for sharing, and I’m looking forward to the post on decorating.
When my kids were little, I used to make a cooked salt dough that was quite similar to the play dough sold in stores. It kept for a long time and cost so little to make. If only more moms knew how cheaply certain things can be made!
Yes if only… I’m going to give soft dough a go I reckon…any tips?
The recipe I have is:
1 c flour, 1/2 c salt, 2 tsp cream of tartar, 1 c water, food colouring (optional), and 4 tsp of cooking oil. Mix flour, salt and cream of tartar. Add food colouring to water. Mix water, oil, and flour mixture over low heat. Stir until thick. Remove immediately from heat, knead and let cool. (Careful – it’s hot – I used to plop it from the pot onto the cold counter, and it cooled fairly quickly, enough that I could knead it and bring the hot spots to the outside, where the counter would cool them too.) Store in airtight container.
Notes: I found the best time to take it off the heat was when it looked like dry-ish mashed potatoes, held together and formed a ball easily. At this point it’s important to get it off the heat and get it cooled quickly to avoid overcooking which will cause it to become too dry. For storage, we kept it in the fridge so it would stay fresh longer.
Good luck! If you have any questions, let me know.
Thanks for this Jo – I will most certainly be trying it out….Thanks again!
how do you preserve them as i have just bought some back from the uk with all my grandchildrens hand prints on them? I can paint them but if i want to put them outside will they then take in the moisture in the air.
Julia – I cant say 100%. As I live in the UK the dough gets drier and drier as it stands. But if you are in a particularly humid environment I do not know whether this would affect the dough. Sorry. My instinct says that they’ll be fine – but cant guarantee it! Jo
Is that recipe not for playdough Jo ?
That looks like fun! I remember the days of making playdough every friday afternoon with my playdough obsessed daughter (she used to go everywhere with a lump of it in her hand!), then our gluten-free days started and I haven’t made any. If I get some separate bowls and a rolling pin just for this kind of thing, I might just have a go 🙂 There is a chance it will be more successful than my knitting…
Oh dear – knitting didn’t work out then? Did you unravel?
Any tips on making a good dough (playdoh) would be much appreciated. that’s next on the list!
I don’t have an oven or a microwave at the moment. When you say they take days to ait dry how long are we talking? Thanks
Can’t say for sure Claire. Will depend on how wet the dough is and thickness etc… count on at least 3 days, but I’d say more like 5. If you paint you also need drying time after that as well as sometimes it softens the dough again!
Well, I’ve given it a go!! Knitting needle to make the holes, borrowed cutters from my landlady and glass bottle as a rolling pin. They are now sitting on foil on the shelf above a radiator!!
Please let us all know how it goes! And how long it took!
Well so far so good!! http://lessismoreihope.blogspot.co.uk/2013/03/experiments-in-salt-dough.html
Well so far so good!! http://lessismoreihope.blogspot.co.uk/2013/03/experiments-in-salt-dough.html
How do u book them without them going out of shape and brown like little cookies? I put them in for 30 mins on 250 deg and that’s how they came out
Hi Clare. It’s probable you have the temp to high. The oven needs to be in the lowest temp and they need to dry out really slowly. You can leave to air-dry also but that’ll take a few days!
Thanks! I’m hoping to make magnets, so my dough will be rolled a little thicker. I’ve had to make my own cookie cutter to get the brand mascot shape I want. Once they’re cut, I’ll press the round magnet into one side, leaving the impression there when it’s dry, then just hot glue the magnet in place when the shapes are dry. Here’s hoping that works.
Love the idea of a magnet! Im going to have a go at these with my son who is nearly 3. I thought we could make something for the Grandmas. It seems to have quite a big application, so Im going to play with it when he is in bed….. hee hee.
Hi. Yrs ago I would make salt dough ornaments. Instead of oven or air dry, I used a dehydrator. U can make them thick too. I turn mine over a few times and usually done next day. Will probably leave lines because of trays but I just used a green square scrubber and took lines away. Could put something on trays if wanted. Also to make holes I used a straw. Im experimenting now with cold porcelain clay and polymer clay. I love making crafts. Hope I didnt step on any toes by my suggestions.
Hi. Yrs ago I would make salt dough ornaments. Instead of oven or air dry, I used a dehydrator. U can make them thick too. I turn mine over a few times and usually done next day. Will probably leave lines because of trays but I just used a green square scrubber and took lines away. Could put something on trays if wanted. Also to make holes I used a straw. Im experimenting now with cold porcelain clay and polymer clay. I love making crafts. Hope I didnt step on any toes by my suggestions.
how many decorations would this amount of dough make?
how many decorations would this amount of dough make?
If I were to use salt dough for my daughter’s science project, would work?
Hi Liana – I’m not sure. Depends on the project. But this recipe will turn out fine! Good luck! Jo
If I were to use salt dough for my daughter’s science project, would work?
Hi Liana – I’m not sure. Depends on the project. But this recipe will turn out fine! Good luck! Jo
Im in the process of making an aztec temple with this recipe, not sure its going to work how i planned!!
Good luck Lisa! I recently made a Mayan Pyramid- but outta cardboard! Oh and I’ve just done a coffin out of icing. Take a look at my post about Halloween from yesterday it’s on there. Never tried salt dough though. I know the icing shrunk and didn’t quite fit together. I used royal icing as a filler to make the joins…
Ps would love to see finished article!
Wow you are very talented! When my children have stopped wanting from me ill sit down and have a proper look at your blog? Site? What ive seen, it looks very interesting.
Lisa – pizza cutters are great for cutting straight lines in dough etc… There’s less drag. Put ruler on dough and run against edge!
Can u use self rising flour?
I wouldn’t recommend it as it will rise. Although I’ve never tried it – so cannot say exactly what the finished item would look like!
Can u use self rising flour?
I wouldn’t recommend it as it will rise. Although I’ve never tried it – so cannot say exactly what the finished item would look like!
Hi, what kind of paint do you recommend using please? x
Hi Nicola – I’ve used acrylic, kids/poster and emulsion. Acrylic smells the most but is thicker. The paint will wear off unless you varnish/enamel them regardless of what you use. Good luck! Jo
Hi, what kind of paint do you recommend using please? x
Hi Nicola – I’ve used acrylic, kids/poster and emulsion. Acrylic smells the most but is thicker. The paint will wear off unless you varnish/enamel them regardless of what you use. Good luck! Jo
Thanks so much for this useful article. I’m trying to make personalised napkin rings for the residents at a care home. If I paint them with varnish, will this protect them if they get wet? Does anyone have any other ideas or suggestions on how to prevent them getting damaged if there are spills?
Lucy I’ll reply in full later just out at the moment… Jo
Lucy varnish or enamel will work – make sure your paint/dough is dry before applying. I use a clear enamel – spray can. Hope that helps and good luck with the rings!
I’ve used clear nail varnish before when I had no enamel. Worked really well and the brush is ideal for getting in the little lines etc.
Fantastic tip!
Thank you so much for this tutorial! The dough turned out wonderful, and it was a quick and enjoyable craft with my 1 year old!! Thanks again!!
Glad it worked out well! 🙂
Thank you so much for this tutorial! The dough turned out wonderful, and it was a quick and enjoyable craft with my 1 year old!! Thanks again!!
Glad it worked out well! 🙂
Reblogged this on little green village.
Reblogged this on little green village.
So glad you stopped by and saw the hearts I made with your dough recipe! I apologize for not sending you the link…time completely got away from me last week. Have a great day!
Angela @ Number Fifty-Three
So great to see the simple recipe transformed into beautiful pieces of nothing less than art! And your photos were stunning. I will be posting the recipe with a link to your blog. I’m not sure whether you’d be happy to let me use an image and credit you. My amateur photography won’t do them justice when I make them myself…
Angela – are you on Instagram? Tried to find you!
Hi, i’m making salt dough decorations, but they do not look the same on the back!!! It doesn’t go as white as front, what should i do? Thanks for help !
Sorry Tracey for not replying sooner. Missed this comment. They need to be turned regularly so they dry evenly. It may be the back never quite looks the same as the front. Very often it can be slightly darker – it depends how they have dried. Jo
Hi im considering making a salt dough ginger bread house for Christmas. I made a proper ginger bread one last year it was quite awsome it even had a tower on the top and a multi coloured light that flashed like in a disco inside however after a few days it started to get soft and started to collapse. So i was thinking of making the same one out of salt dough but what would you use to stick ( glue ) all the bits together with , i was thinking pva glue or a hot glue gun. I would be greatful for any advice. Thanks From Sarah
Interesting question Sarah and it’s ignited my imagination! I use superglue when attaching things to my salt dough…but…interesting I am about to but a hot-glue-gun as I have another project. Leave with me. I’ll be back! Jo
I would like to use salt dough to make Christmas decorations and then get the children to decorate them. Can they use felt tip pens ? And then use normal kids glue to stick on sequins and glitter and things or will it not take? How long do they last ie will they last until next Christmas or more a use this year and throw away type decoration?
Thanks all x
What make of lawyer do you use please and how long does it take to dry please ?
Laquer not layer !
Hi Mandy – I have Fast Dry Enamel (clear spray – aerosol) – Jo
What make of lawyer do you use please and how long does it take to dry please ?
Laquer not layer !
Hi Mandy – I have Fast Dry Enamel (clear spray – aerosol) – Jo
How long does it take to dry ?
I’m making decorations with children at Church and font want them to take them home tacky
Thanks x
How long does it take to dry ?
I’m making decorations with children at Church and font want them to take them home tacky
Thanks x
I bought a heap of salt a few weeks ago to make a batch of decorations with the kids too! These look great!
Thanks Kelly and have fun!
I bought a heap of salt a few weeks ago to make a batch of decorations with the kids too! These look great!
Thanks Kelly and have fun!
I know it would depend on how thick you rolled your dough, but, how many, roughly, do you think this will make. Planning to do it with my class
I know it would depend on how thick you rolled your dough, but, how many, roughly, do you think this will make. Planning to do it with my class
Hello, can you add food coloring to the dough to make different colours or will this not set properly? Thanks for the gread post
Yes I think that should be fine. I paint afterward but don’t see why you couldn’t do that. Think I’ve seen it done at a school…
Thank you very much
Hello, can you add food coloring to the dough to make different colours or will this not set properly? Thanks for the gread post
Yes I think that should be fine. I paint afterward but don’t see why you couldn’t do that. Think I’ve seen it done at a school…
Thank you very much
Hi, my daughter and I are making a giant snow globe. I am just wondering if we used salt dough figures, would they be ok and not disintegrate in the water? Could I protect them with anything? Thank you.
Hi, my daughter and I are making a giant snow globe. I am just wondering if we used salt dough figures, would they be ok and not disintegrate in the water? Could I protect them with anything? Thank you.
Have you ever added food colouring…I’d like to do flesh coloured to avoid having to paint a large number?? Am making babies before anyone gets the wrong idea!
🙂 Sounds a great tip – will try!
Have you ever added food colouring…I’d like to do flesh coloured to avoid having to paint a large number?? Am making babies before anyone gets the wrong idea!
🙂 Sounds a great tip – will try!
Hi, I would like to make ornaments out of salt dough for my wedding centerpieces, but haven’t been able to find an answer to whether or not they can be under water? We are having a nautical theme, and I would like to have an “under the sea” vase with floating candles… the starfish, shells, anchors, light houses and ships wheels would all be in the water? SO… can salt dough be left to sit in water after it has been dried in the oven and painted??
Hi Brittany – I have tested it for you. The salt dough goes soft even when painted with acrylic paint – sorry! Overnight I will test a clay shape – because that may be an option for you. I will be back tomorrow to advise – Jo
Oh darn. That’s ok, I will just ixnay the water and put in a pillar candle instead. Thank you so much for the reply, and if you do the clay experiment, let me know!
Hi, can you make the salt dough in advance ?
I would like to do this with my beavers but would have to make the dough in the day to use in the evening. Thank you for your help
I have made some baked them and then painted sealed ready to send and they are going soft whàt should I do with them I live in Malaysia sending them to nz for Xmas gifts.
Hi we have just done some of these can you advise please what kind of paint do you use and what do you use to seal them with afterwards if this is needed?? Thanks
Hi i just got done with doing it and do you refrigate it after your done? so it can harden like clay?
Hi can you add a pet warning to your article please? Salt dough is extremely toxic to dogs – and they will eat it! Do not hang salt dough ornaments where a dog might be able to reach them.
Where did you get the butterfly cookie cutter?
If you want to keep the things forever, use a cold porcelain recipe – allow for 20% shrinkage. If you want to attach pieces, use pva glue afterwards – as these air-dry, it will take too long and cause warping if you layer dough items.
I suggest this, as salt is notorious for attracting moisture, and eventually your items will be mushy.
Cold porcelain can be patterned, much like fondant, and kept for years, if varnished. Better for favours.
Salt dough is great, I used to make plaited fruit wreaths at Christmas – had so much fun making tiny pears and peaches! Then I’d get depressed when they were mushy by January, even though I varnished. Too humid in Sydney!
there’s mention of air drying in warm place. can these pieces be sun-baked and would it make a difference?
It can be air-dried no problem!
Hi
Have just had a go at making this and after 40 minutes the smaller ones are burnt (look like they are made from a chocolate dough!) and they have all puffed up. What will have caused the puffing up? Think the burnt-ness is just my dreadful oven (whenever I bake the back left corner always end up burnt!). I have just taken them out of the oven and will leave them for a few days before painting them. My 2 year old loved making these, and luckily the dinosaurs she cut out are salvageable, but be nice to do ones that don’t puff up like yours!!
Thanks 😊